
You've created a video masterpiece in Adobe Premiere Pro, but something’s missing. Could it be… captions? Whether you aim to pump up your video’s accessibility, increase engagement online, or add professional subtitles; this comprehensive guide will walk you through adding captions in Premiere Pro.
Let's transform your audio into clear, readable text that enhances your content to thrive in the World.
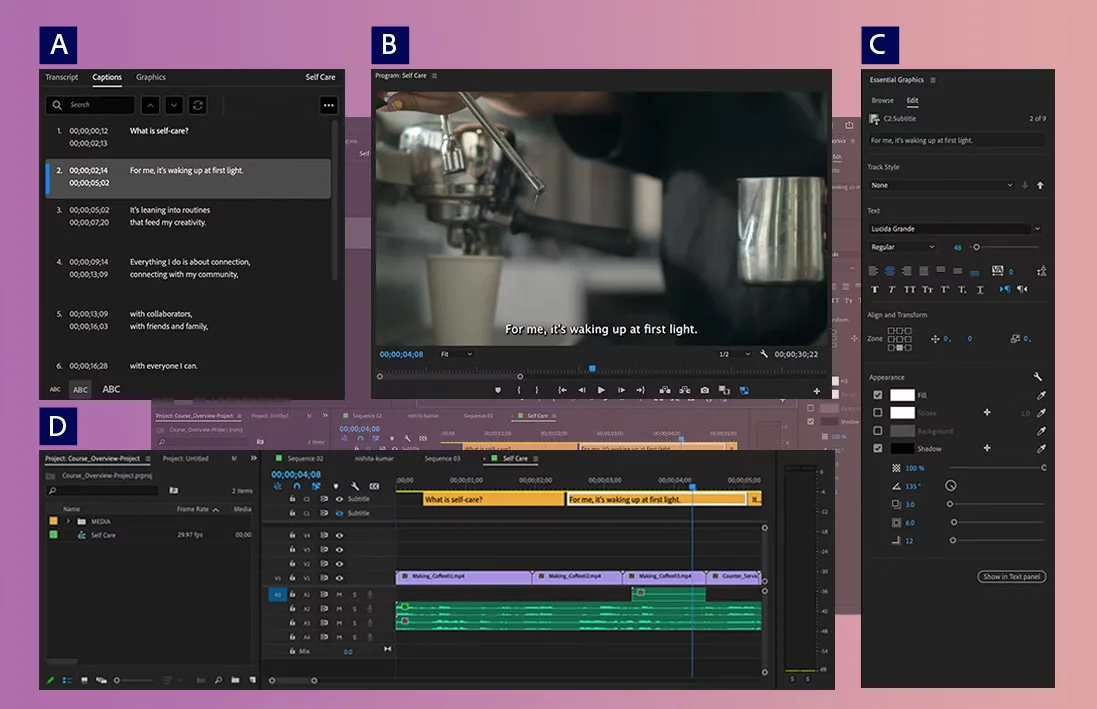
With Premiere Pro, you’ve got a suite of tools at your fingertips to craft, edit, style, and export captions and subtitles in any format you need. Kick things off by generating a transcript of your video.
From there, go into the Text panel, fine-tune your script, and with a click, transform it into captions that sync perfectly with your timeline. Whether you’re tweaking text directly in the Text panel or getting hands-on with on-screen edits in the Program Monitor, Premiere Pro lets you fine-tune every detail to your taste.
Ready to roll? Let’s dissect this down to the nitty-gritty and learn how to add captions to video in Premiere Pro.
Act One: Understanding Captions
Captions and subtitles aren’t just add-ons; they’re game-changers that make your videos more accessible and boost viewer engagement. They’re the secret that helps your content connect with a broader audience. Why is everyone using subtitles these days? It's because they enhance comprehension, allow for silent viewing, and cater to diverse audience needs.
These are the most popular: Standard Subtitles, Closed Captions, Open Captions, Burned-In Subtitles, Live Captions and Transcriptions.
Act Two: Step-by-Step Guide to Captions in Premiere Pro
Now that you speak fluent captions, let's learn how to add them to your videos. Access your captions via one of these methods:
Converting Your Transcript into Subtitles
Now that your transcript is finally done, it’s time to convert it to subtitles.
- In the Captions panel, click the three dots and choose 'Create Captions'.
- A settings dialogue will appear, allowing you to customize the appearance and duration of your captions.
- After adjusting the settings, click 'Create Captions'. Premiere Pro will generate synced subtitles.
Knowing and Using SRT Files
If you already have a transcription file (SRT stands for SubRip Subtitle file), skip the AI process and directly import your SRT file to the Premiere Pro.
- Click the three dots in the Captions panel’s top-right corner.
- Select ‘Import’ > ‘Import Static Transcript’.
- Locate your file and click 'Import'.
Your transcription will now be integrated.
Customizing and Manually Adding Captions
Premiere Pro offers customization options that can help you materialize the exact idea you have in mind and even enhance it!
- Select the caption you want to modify in the Captions panel.
- Adjust the text or timing as necessary.
Manual Captions
- Right-click a nearby caption in the Captions panel and choose 'Add New Caption Before/After'.
- Enter your text in the new caption box.
Styling and Customizing Captions
In the 'Essential Graphics' panel:
- Double-click a caption in the Timeline to access the 'Essential Graphics' panel.
- Adjust the font, color, and other settings to match your video’s style.
Apply New Style to all Captions:
Click the redefine style icon next to the 'Track Styles' dropdown and select 'All Captions on Track'.
Save New Style:
Click the '+' icon next to 'Track Style', name your style, and click 'Save'.
Importing and Exporting Caption Settings
Importing
Open the Captions Tab, select 'Import Captions', follow the prompts.
Exporting
Click the three dots in the Captions panel, select 'Export XML', name file, choose a location, and click 'Save'.
Act 3: Using AI to Transcribe Your Sequence
With the Captions panel open, let Premiere Pro’s AI do the transcription. This tool converts spoken words into text, provided your audio is clear.
- In the Captions panel, click 'Transcribe Sequence'.
- A pop-up will appear. Select a language and click 'Transcribe'.
Premiere Pro will scan your audio and create time-coded text boxes. You can edit any text by double-clicking on a box. When you play the sequence, the highlighted text will sync with your dialogue for easy positioning.
AI video captioning is revolutionizing the way we add subtitles to videos, making the process faster and more accurate than ever before.
This can get a little sticky sometimes, but we found a way around it… To work smarter, not harder, we created Gling as the best solution for efficient captioning. Why are captions and subtitles so important? Captioning is an essential element for your content to reach as many people as possible worldwide.
Remember more than 80% of social media users watch their videos with their sound off… and their captions on! Captions are essential to speak the language of the global community clearly and easily. Give a try to a new way of generating quality captions in no time.
Act 4: Troubleshooting
Troubleshoot: Captions Not Showing Up
- Ensure the caption track is turned on in the timeline.
- Confirm the caption file is in a supported format (e.g., .srt, .scc).
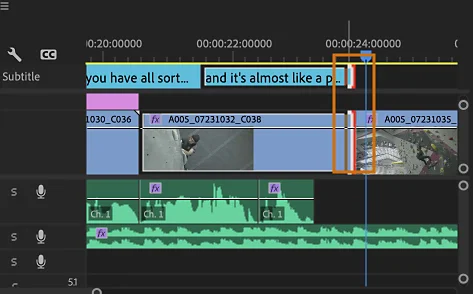
Sync Captions in Premiere
- Align captions with the audio waveform in the timeline.
- Ensure the caption file’s frame rate matches your video’s frame rate.
Formatting Captions
- Use the Essential Graphics panel to adjust font, size, and position.
- Use the Align and Transform options to correct any display issues.
Exporting Captions
- Ensure captions are correctly formatted for export.
- Choose between burned-in subtitles or sidecar files (.srt).
Glitches
Make sure caption tracks are linked to corresponding video/audio tracks.
Compatibility
If you are running into compatibility issues on Premiere Pro, then Update the Software or Re-import or recreate captions.
Conclusion: Ramp Up Your Videos with Captions
Adding captions in Adobe Premiere Pro isn’t just about meeting accessibility standards for digital platforms or social media—it’s about enhancing your content's impact, reaching a broader audience, and making sure that your work connects with your viewers in a direct and clear manner.
With these techniques and tips, you can create captions that are not only useful but also visually appealing. Let your videos communicate your concepts and bright ideas clearly, confidently, and with pizzazz.
For those looking to streamline their workflow even further, exploring text-based video editing techniques can complement your captioning process and enhance overall productivity.