Editing Multicam on Final Cut: Workflow
Some say it’s all about perspective—multicam editing in Final Cut Pro gives you the tools to create slick, professional videos that stand out and catch the Marketing Industry’s attention.
It allows you to sync, cut, and switch between multiple camera angles without clutter. For those looking to enhance their content creation for YouTube, multicam editing is a game-changer. Let’s cut to the chase from capturing your footage to the Final Cut.
The Big Deal About Multicam Editing
If you’ve got footage from several cameras, manually syncing clips sounds like a nightmare. That’s where multicam editing in Final Cut Pro comes in. It lines up multiple angles, lets you switch between them seamlessly, and helps create a polished final product. This technique is particularly useful for vlog editing workflows, allowing creators to easily switch between different camera angles and create more dynamic content.
How to Prep for a Multicam Video Shoot
Before you even start shooting, a little prep work can save you hours on set, and the editing room.

Sync Your Cameras:
Make sure all your cameras have the correct date, time, and time zone. This helps Final Cut Pro sync everything up later.
Timecode or Sync Markers:
If you’re using pro-level equipment, sync your cameras with a common timecode for all. If not, use a slate, camera flash, or a sharp noise to create a sync and level reference that you can easily match-frame with video in post.
Capture Audio Everywhere:
Record audio on every camera. Even if you only use one audio source in your final edit, having reference audio on all your angles will make syncing so much easier.
How To Transfer Multicam Footage into Final Cut Pro
Getting raw clips into Final Cut Pro is easy, but here’s a take on how to improve your workflow for multicam editing.
Organize:
Start by creating a Library, Event, and Project in Final Cut Pro. Keeping your files organized from the get-go will make the entire process smoother.
Import:
Use 'File > Import > Media' or hit Command + I to bring your footage into the project. Keep everything labeled and organized to avoid headaches later.
Retag:
Rename your clips in the Browser with clear labels. This makes it easier to identify different camera angles and footage when you start editing.
How to Make a Multicam Clip
Now that your raw footage is imported and organized, it’s time to set up your multicam clip.
Select:
Highlight the clips you want to include in your multicam edit.
Create:
Go to 'File > New > Multicam Clip', give it a name, and select the appropriate Event. Final Cut Pro will automatically create angles for each clip.
Sync:
Check the "Use Audio for Synchronization” option if your clips have audio tracks. Final Cut Pro will sync the clips based on their audio, saving time.
Tweak:
If the automatic sync isn’t perfect, you can manually adjust the alignment in the Angle Editor. Just drag the clips to match visual or audio cues.
Navigating the Angle Viewer and Editor
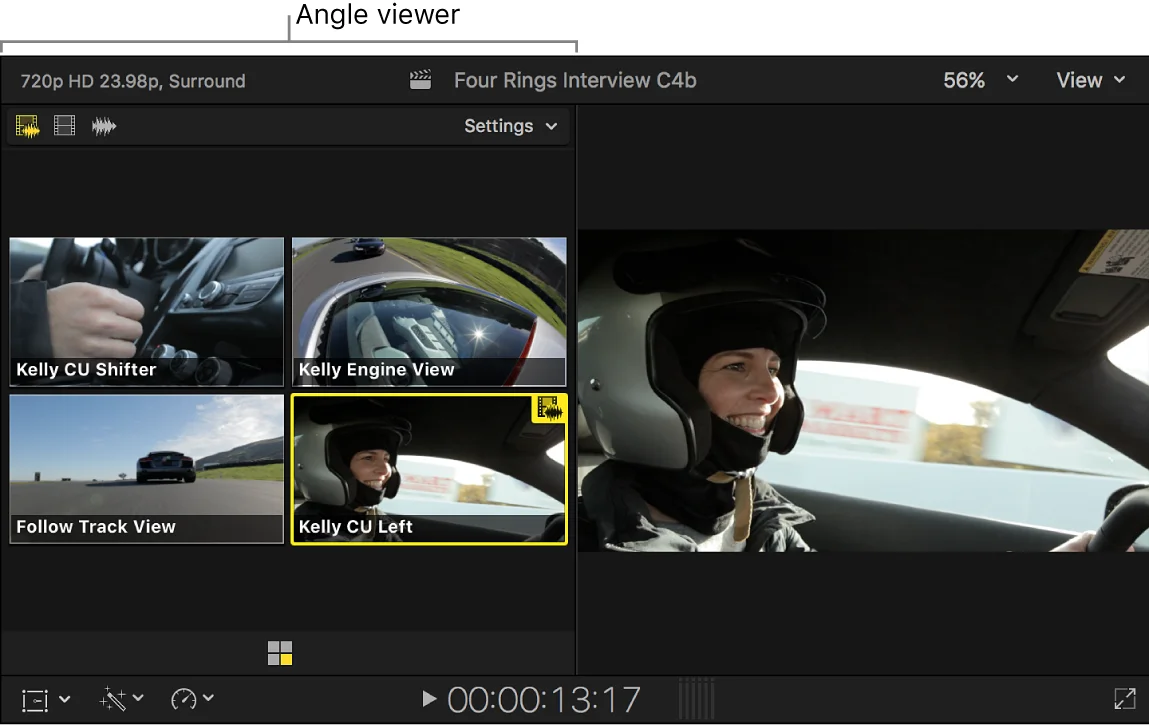
Angle Viewer:
This tool lets you view all your angles at once and switch between them in real-time. You can access it by going to `View > Angles' or pressing Option + Command + 7.
Angle Editor:
Double-click your multicam clip to open the Angle Editor. Here you can adjust the sync, rearrange angles, and even apply effects or color corrections to individual clips. Think filters, but created by you.
Fine-Tune Sync:
Go over your footage more than once… Or twice. Then ensure everything is synced correctly. If anything looks off, use the Angle Editor to make precise adjustments.
Cutting and Switching
Bring your multicam edit to life:
Drag Clips:
Drop your multicam clip from the Browser into the Timeline.
Quickly Switch Angles:
Use the Angle Viewer to switch between video and audio angles while playing back the clip. Click on the angle you want, and Final Cut Pro will create a cut at that point.
Adjust Cuts:
If you need to adjust a cut, just move it around in the Timeline, or switch to a different angle by clicking in the Angle Viewer.
How Gling Can Streamline Your Multicam Editing
Editing multicam footage in Final Cut Pro is cool, but Gling’s AI-powered tools can take it to stratospheric levels of awesomeness. As an ai video editor for YouTube, Gling helps optimize your workflow by automatically removing bad takes, silences, and filler words—leaving you with an optimal prime product. Gling is one of the most advanced AI tools for video editing, offering features like:
- Remove Bad Takes in a Snap
Instantly refine your content by removing all bad takes and retakes, ensuring you present the best version of your work.
- Auto Remove Silences & Filler Words
Gling AI detects and cuts out silences and filler words like "um" and "uh," so you spend less time editing and more time creating. This feature helps you remove filler words effortlessly, improving the overall quality of your video.
- AI Text-Based Video Trimmer
Simply edit the transcript text, and the changes automatically reflect in your video. This saves you time and helps create outstanding content.
Pro Tips
Use Metadata Tags:
Apply Camera Name and Camera Angle tags to your clips before creating your multicam clip. This makes it easier to stay organized and switch between angles during editing.
Optimized Media:
If your project lags, go to 'Preferences > Playback' and enable "Create optimized media for multicam clips." This creates lower-res copies for smarter editing.
Duplicate Before Major Edits:
Before making significant changes, duplicate your multicam clip. Hit 'Edit > Duplicate Clip'. Don’t trust undo. It’s a trap!
Troubleshooting
Sync problems? No problem!
Manual Sync:
If Final Cut Pro’s automatic syncing isn’t cutting it, manually adjust the clips in the Angle Editor.
Find a Sync Point:
Look for a loud noise or visual cue to line up your clips. Align the playhead on one clip, then drag the others to match.
Precision Adjustments:
Zoom in on the Timeline to make fine-tuned adjustments. Play back the synced clips to ensure they’re aligned.
Wrap It Up!
Multicam editing in Final Cut Pro offers many options to fire up your audiovisual game. Whether you’re syncing footage from a big event or just playing around with multiple angles, this tool can save you tons of time and produce an engaging, professional video.
Follow these steps and you’ll be cutting between angles like a pro and faster than you can say: "It’s a wrap!"